Showing posts with label Katrina Hunt. Show all posts

Wednesday, December 3, 2014

Quilled Bells Christmas Card

Making Christmas cards, do you participate?! I make a few, but not for everyone on my list! But here is a cute one for someone special (like maybe my next door neighbor!)

Quilled Bells Christmas Card by Katrina Hunt for 3 Birds Design

I started this card with just the idea of a quilled wreath. I looked around the internet for inspiration, but didn’t really find anything that caught my eye. So, I decided to create my own design. Which is easy to do with basic shapes and some quilled coils!

Quilled Bells Christmas Card by Katrina Hunt for 3 Birds Design

After my wreath was done, I knew it needed something else and that is where the bells came in! I took Chasity’s acorns as an idea and tweaked it. I glued 10 quilling strips together and then just rolled with it! Once I got the coil done, I stretched it similar to how she did her acorns. Then I SMASHED it! Which gives the bell it’s shape. I lined the inside with the glue, just like she did and let dry.

Quilled Bells Christmas Card by Katrina Hunt for 3 Birds Design

At this point, I still needed to add something, so I pulled out some stickers from the Holiday Quilled Cardmaking kit and then the Sticker Flair kit and created my sentiment.

Quilled Bells Christmas Card by Katrina Hunt for 3 Birds Design

And even though, I probably won’t mail this card, I think you could. Especially since the bells are smashed! In your cardmaking kit there are some foam sheets that are to help cushion your card if you should decide to mail it. How clever!!!

Quilled Bells Christmas Card by Katrina Hunt for 3 Birds Design

Thanks for stopping by the 3 Birds Studio blog today. Make sure to share your creations with us on Facebook and Instagram! We would love to see them!

Katrina Hunt - Paper, Scissors and Glue

SUPPLIES |  Sticker Flair Kit, Holiday Season Quilled Cardmaking Kit, Pearlescent and Foil Goodie Box

Tuesday, November 25, 2014

Fall Gift Bag

Happy Thanksgiving a day early to all the US people out there! And Canada, here is wishing you early for next year!

It’s Katrina here today to share a fun little altered gift bag that would work to bring some goodies to a fall party, or to just use for a hostess gift. You could whip this bag up today and take it tomorrow to all your festivities!

Fall Gift Bag by Katrina Hunt for 3 Birds DesignI love brown bags from the craft store that you can decorate for any season. I try to keep some on hand at all times. The Midday Medley collection works great for this fall themed bag that I did.

I just covered the front with the fun plaid paper, then I added a few die cut leaves. I really wanted the leaves to stand out, so I inked the edges. I am usually not an inker, but the gold on the black leaf was calling to me!

Fall Gift Bag by Katrina Hunt for 3 Birds DesignOnce I used the gold ink on the edge of the leaf, I knew I had to use some of the goodies in the Touch of Glimmer kit! I used an arrow card just as an added layer and then the little green and gold medallion worked perfect with a die cut leaf to accent the corner.

Fall Gift Bag by Katrina Hunt for 3 Birds DesignAnd I decided to ink all the leaves and also pop them with foam adhesive. This gives the bag a little more dimension and pop of something fun. I am not a “one color” inking type of person, so I mixed it up with the gold, yellow and orange!

Fall Gift Bag by Katrina Hunt for 3 Birds DesignThanks for stopping by! Take a present to your hostess and don’t eat too much turkey! Gobble Gobble!!

Katrina Hunt - Paper, Scissors and Glue

SUPPLIES |  Midday Medley Paper Collection,  For All Seasons Themed Card Kit -FallTouch of Glimmer Embellishment Kit

Thursday, November 13, 2014

Give Thanks Embroidery Hoop Fall Home Decor

I cannot believe fall is here and it’s almost Thanksgiving here in the US. November is half over and Christmas will be here before we know it! But I am keeping with Thanksgiving here on the blog.

This project is super easy to create and would look great greeting your visitors or as a centerpiece for a table.

Give Thanks Embroidery Hoop Fall Home Decor by Katrina Hunt for 3 Birds DesignThis is just a wooden embroidery hoop that I altered to use as a decoration. I have a few of these around, because I used to cross-stitch. But, you can find these in your local craft store or for cheap at flea markets!

I used the Midday Medley paper collection, Nestable Sticker pad, For All Seasons cards, and the Pearlescent and Foil Goodie box to create with. I pulled out the “Give Thanks” card and then added some layers behind it, popping them up with some foam adhesive.

Give Thanks Embroidery Hoop Fall Home Decor by Katrina Hunt for 3 Birds DesignI added the die cut leaf wreath under the card cluster as an accent. Then I decided it needed a little glam and then added a few of the Pearlescent goodies to it near the cards.

Give Thanks Embroidery Hoop Fall Home Decor by Katrina Hunt for 3 Birds DesignThe sticker was easy to add to the edge, you just have to plan! And have some baby powder on hand. Just pull the sticker out of the pad carefully and then sprinkle baby powder all over the sticky back. This will take away the stickiness, but you will still be able to attach the sticker with adhesive dots or liquid glue on the parts that are touching the hoop. I did have to trim my sticker slightly to make it fit, but I covered that part up with a bow!

Give Thanks Embroidery Hoop Fall Home Decor by Katrina Hunt for 3 Birds DesignThanks for stopping by today. Make sure to leave some time for crafting during the holiday season!!
Katrina Hunt - Paper, Scissors and Glue

SUPPLIES |  Midday Medley Paper Collection, Midday Medley Nestable Sticker PadFor All Seasons Themed Cards Kit,  Pearlescent and Foil Goodie Box

Sunday, November 2, 2014

Punch Your Border Cards

Did you grab the new goodies that came out on HSN? There are so many fun things you can do with them. Today I am sharing a bit of a tutorial on how to make some fun edges for your cards.

Punch Your Border Cards by Katrina Hunt for 3 Birds DesignI will admit I am a collector of border punches. I used to haul a bunch of them to crops with me. But, I know a lot of people may just have them sitting around and might have forgot about them. I like to look for unique ways to incorporate punching into my projects. Let’s get started.

I used the Flora Festival Page Kit for these cards. This actually comes with premade card bases, but don’t be afraid to punch those bases or use them in other ways. I started by picking some card bases and some paper to play with. When you cut the paper you are going to punch, cut a little longer than you want, so you have room to match the edges.

Punch Your Border Cards Tutorial by Katrina Hunt for 3 Birds DesignThen I picked out a couple of border punches. NOTE: This is not an exact science! When you try this, I suggest trying on scrap paper and get an idea of how your punch works, before trying on the pretty paper. The easiest way I have found to start is to start with your punch back facing to you, so you can see where you are punching.

Punch Your Border Cards Tutorial by Katrina Hunt for 3 Birds DesignI start on the edge of the cardstock and at the edge of the punch. Then punch up one side. Flip your paper over to the opposite side and punch again starting on the edge (or wherever you decided to start on your punch). This will help you line each side up. All punches have different design lengths. The two I used had a 1.75 inch and then a 2.0 inch length of design.

Punch Your Border Cards Tutorial by Katrina Hunt for 3 Birds DesignOnce punched, then fold your paper matching edges at you fold. See below.

Punch Your Border Cards Tutorial by Katrina Hunt for 3 Birds DesignMy first card, I just used this technique for the center part of my card. You can see how my paper goes on the front and back of the card.

Punch Your Border Cards Tutorial by Katrina Hunt for 3 Birds Design

Choose some embellishments to decorate your card. I made a very clean and simple thank you card that would easily go thru the mail.
Punch Your Border Cards by Katrina Hunt for 3 Birds Design

When I made the other card, I did the edges of the card base. I wanted to add a little fun to this card, so one of the layers I made hang over the top of the card, as you can see here.

Punch Your Border Cards Tutorial by Katrina Hunt for 3 Birds Design

So you can see how border punches can add some fun to your cards in different ways.

Punch Your Border Cards by Katrina Hunt for 3 Birds Design

Thanks for stopping by the 3 Birds Studio blog today. Make sure to share your creations with us on Facebook and Instagram! We would love to see them!

Katrina Hunt - Paper, Scissors and Glue

SUPPLIES | Flora Festival Page Kit

Wednesday, October 22, 2014

17turtles + 3 Birds Creative Team Up | Life Is

I hope you all are enjoying our Creative Team Up with 17turtles digital cut files and the great 3 Birds products. It’s Katrina to share a layout using the Midday Medley collection teamed up with the new Touch of Glimmer kit.

Life is a Beautiful Ride Scrapbook Page by Katrina Hunt for 3 Birds Design featuring 17turtles Digital Cut FilesI used the 17turtles Circles Within Circles file for my layout. It worked well with the embellishments in the Touch of Glimmer kit. I made a collage out of some of the embellishments for my title and then tucked some of the circles around it.

Life is a Beautiful Ride Scrapbook Page by Katrina Hunt for 3 Birds Design featuring 17turtles Digital Cut FilesI did the same thing with one of the other embellishments, but used the circles that I had cut in larger sizes as a base for the “smile” embellishment.

Life is a Beautiful Ride Scrapbook Page by Katrina Hunt for 3 Birds Design featuring 17turtles Digital Cut FilesI used some of the cards that came in the kit for some layers and then added an embellishment on top of them. There are also SEQUINS (!!!) in the kit, which I used in the middle of some of the embellishments also.

Life is a Beautiful Ride Scrapbook Page by Katrina Hunt for 3 Birds Design featuring 17turtles Digital Cut FilesAnd in case you are wondering, 3 Birds Design papers cut BEAUTIFULLY in your die cutting machine. Not only the pattern papers, but the foil and glitter papers also!

Thanks for stopping by today! I have another project on my personal blog using another one of the 17Turtles cut files if you would like to see it. You can find that project HERE.

Also don't forget you can use Coupon Code 3BIRDS17 to save 25% on any purchase from the 17turtles Etsy Shop!

Katrina Hunt - Paper, Scissors and Glue

3 BIRDS SUPPLIES | Midday Medley Paper Collection, Sticker Flair Mega Kit, Touch Of Glimmer Embellishment Kit

17TURTLES DIGITAL CUT FILES | Circles Within Circles

Tuesday, October 14, 2014

30 Minute Layout Tutorial

Running short on time with the holidays coming up?! It's Katrina and I am here to show you how to create a layout in 30 minutes! I have measurements and step out photos for you, so you can just grab some pictures, papers, embellishments and then cut and go!

I used the new Flora Festival Page Kit that debuted on HSN last week. This is perfect for a go to kit when you are in a hurry. Here is the layout we are going to create.

Well Hello Adventure Scrapbook Page by Katrina Hunt for 3 Birds DesignI started by picking out four papers. The papers mix and match so well in this kit, it was a hard choice! I started with the navy paper, which I knew I wanted as my background and then went from there for paper selection.

Well Hello Adventure Scrapbook Page by Katrina Hunt for 3 Birds DesignI already had my pictures printed and they are sized at 3 x 5 inches. I print at home so it’s easy for me to size how I want, but this layout will work with 4 x 6 with a little different sizing of middle pieces of paper.

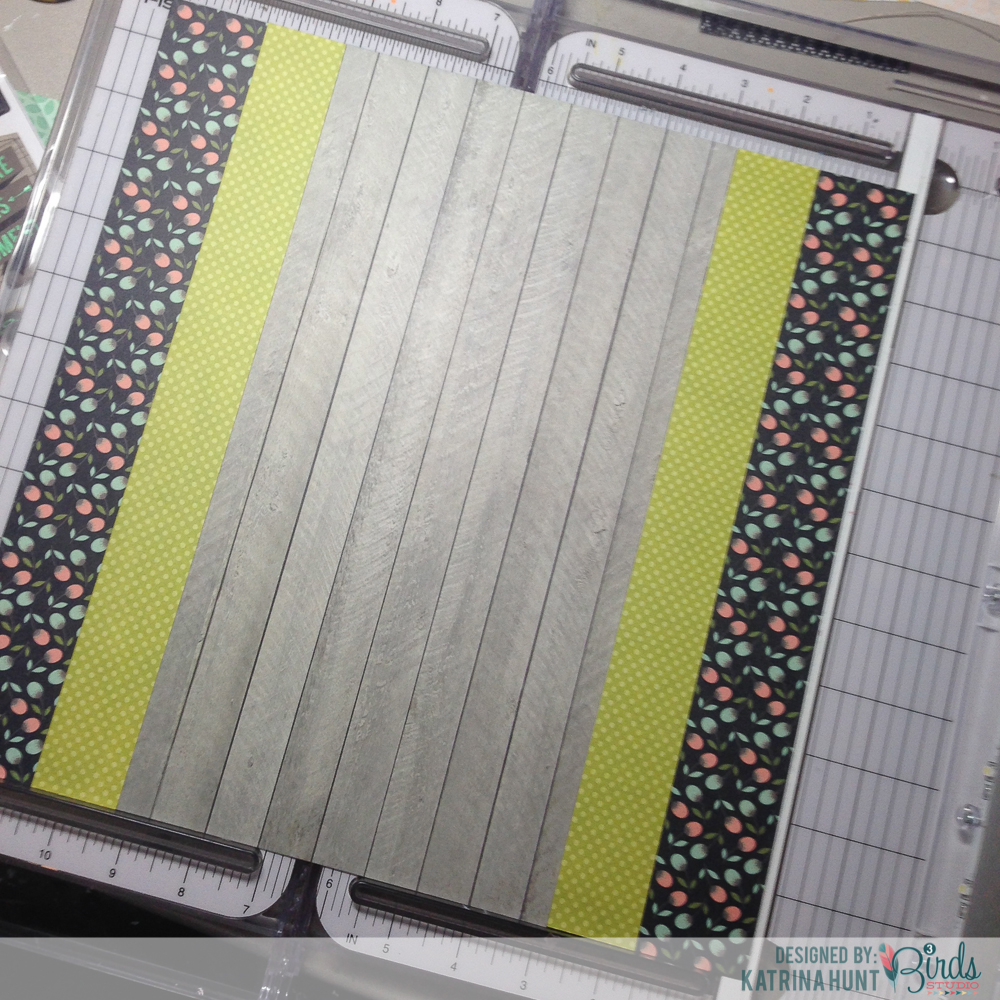
I cut my papers into the following sizes:

  • Navy background I left at 12 x 12 inches

  • Green Polka Dot 1.25 x 12 inches

  • Woodgrain 6.5 x 12 inches

  • Peach Floral 5.5 x 11 inches


Once you place the first green strip, all the other pieces will fall into place. You will place the outer edge of your green strip about 1.25 inches in from the right side (or left, you choose!).

Well Hello Adventure Scrapbook Page by Katrina Hunt for 3 Birds Design

Adhere your woodgrain paper next, right up against the green strip you just placed. Then you will place the second green strip on the other side of the woodgrain. Your background will look like this:

Well Hello Adventure Scrapbook Page by Katrina Hunt for 3 Birds DesignOnce you have your background, then cut a strand of the navy and white twine 18 inches. This will allow you to wrap your twine around the bottom edge of your peach floral paper and attach it to the back with adhesive. Then with the remainder of your twine, tie a bow and place it in the center of your wrapped twine. Center and adhere this down to your woodgrain paper. The Placement of the bottom edge of floral paper is about .75 inches from the bottom of your layout.

Well Hello Adventure Scrapbook Page by Katrina Hunt for 3 Birds Design

Adhere your photos down the middle of your page and then start embellishing! There is such a wide assortment of embellishments to choose from!

Well Hello Adventure Scrapbook Page by Katrina Hunt for 3 Birds DesignWell Hello Adventure Scrapbook Page by Katrina Hunt for 3 Birds DesignWell Hello Adventure Scrapbook Page by Katrina Hunt for 3 Birds Design

My page didn’t require a lot of journaling, but I added just a little on the left side above the camera embellishment. To change this layout up, you could always add journaling strips, use a border punch on the green strips, add extras strips of paper, etc. This is a great basic design to start with and let your imagination go wild with! Thanks for stopping by the 3 Birds Studio blog today!

Katrina Hunt - Paper, Scissors and Glue

SUPPLIES | Flora Festival Papercrafting Kit

Tuesday, October 7, 2014

Halloween Treat Set

Halloween is just around the corner and we are giving you some fun ideas here on the 3 Birds Studio blog. I am sharing some fun and quick treat bags, along with a card for those special goblins that come to trick or treat.

Halloween Treat Card Set by Katrina Hunt for 3 Birds DesignI used the Graceful Season and Midday Medley Paper Collections. These have all the right colors for Halloween goodness! This witches hat treat bag was create from the Graceful Season foil pad and the 12 x 12 paper pad. I love the green foil paper!

Halloween Treat Card Set by Katrina Hunt for 3 Birds DesignThese treat bags are very easy to create with or without a die cutting machine, so don’t feel like you need to have a die cutting machine to make treat bags. Find a pattern online, trace it or simply just add lot of embellishments to make your toppers. Then attach your “centerpiece” to a piece of pattern paper that is the width of your bag and folded over. To attach your assembled piece onto your sandwich bags, just use a stapler!

Halloween Treat Card Set by Katrina Hunt for 3 Birds DesignHalloween Treat Card Set by Katrina Hunt for 3 Birds Design

And then I made a fun card to go along with the treat bags. The bats were just adorable and I thought the Midday Medley Glitter Paper would be perfect for them.

Halloween Treat Card Set by Katrina Hunt for 3 Birds DesignThe card just slips out and is basically a tag. I haven’t come up with the perfect spooky saying yet, so I have left it blank for now! And an added touch with the Pearlescent and Foil Goodies!

Halloween Treat Card Set by Katrina Hunt for 3 Birds Design

You can make these for all sorts of celebrations and occasions. These would be adorable with pumpkins, cornstalks, and cornucopias for Thanksgiving! Thanks for stopping by today. BOO!

Katrina Hunt - Paper, Scissors and Glue

SUPPLIES | Graceful Season Paper Collection Graceful Season Sticky Sparkly Glitter & Foil Chipboard Set, Midday Medley Paper Collection, Pearlescent & Foil Goodie Box

Sunday, September 28, 2014

Touch of Glimmer Cards with Bow Tutorial

Have you SEEN the new Touch of Glimmer kit yet? I am in love with it and so I'm featuring it here on the blog today. I wanted to show you how easy it is to create elegant cards with just a few pieces from the kit. Also, I am going to show you how to make the bows that come in the kit!

Touch of Glimmer Cards by Katrina Hunt for 3 Birds DesignHow fun and elegant are those cards?! There are lots of elements to play with in the kit. The bows actually come in three pieces and you have to piece them together.

Touch of Glimmer Bow Tutorial by Katrina Hunt for 3 Birds DesignYou can make bows that are “poofy” as I like to call them, or you can choose to make flat ones. My cards feature one of each. My step-outs show how to make the poofy one, but all you would do for the flat one is just flatten the bow.

First use your fingers to curl the main part of the bow, just kind of roll it a little until you get a nice curl in it. Then place an adhesive dot in the center on the back of the bow. I used Zots by ThermOWeb in the small size for piecing my bow together.

Touch of Glimmer Bow Tutorial by Katrina Hunt for 3 Birds DesignFold in the ends of the bow and adhere them to the dot in the center of your bow. Don’t flatten if you want poofy, just carefully curl the ends toward the middle. If you want flat, just smash it down!

Touch of Glimmer Bow Tutorial by Katrina Hunt for 3 Birds DesignTo cover the center, you will use the small rectangle piece. I used around 3 to 4 adhesive dots to completely cover my rectangle. Then you will just fold this over the center of the bow and adhere the ends.

Touch of Glimmer Bow Tutorial by Katrina Hunt for 3 Birds Design

Touch of Glimmer Bow Tutorial by Katrina Hunt for 3 Birds DesignUse the remaining piece and attach it to the side of the bow that has the seam of the center piece showing. Now you have a cute bow, which we are going to make cuter by putting on a card!

I used one of the shaped tags in the kit and cut it half to make it go further. The middle will be covered up by another tag.

Touch of Glimmer Bow Tutorial by Katrina Hunt for 3 Birds DesignAdd another tag from the kit to cover the middle and then attach your bow at the top. I just used some mounting squares, because they were the perfect size and I needed something bigger than the Zots that I had been using.

Touch of Glimmer Bow Tutorial by Katrina Hunt for 3 Birds DesignTime to put the finishing touches on. There is also chipboard that comes in the kit. It is not self adhesive, which I love! You can choose what adhesive you want to put on there. I like to use 3D foam adhesive for chipboard, so this works out great that the chipboard will not stick to your project, only where you have put it!

Touch of Glimmer Bow Tutorial by Katrina Hunt for 3 Birds DesignSo, lets see some close ups!

Touch of Glimmer Cards by Katrina Hunt for 3 Birds DesignThat cute bow up close!

Touch of Glimmer Cards by Katrina Hunt for 3 Birds DesignAnd then my other card, where the bow is flattened.

Touch of Glimmer Cards by Katrina Hunt for 3 Birds Design

Touch of Glimmer Cards by Katrina Hunt for 3 Birds Design

I focused on the gold in the kit, but there is also silver for you silver lovers! Thanks for stopping by the 3 Birds Studio blog today. And I hope you pick up the Touch of Glimmer kit soon!

Katrina Hunt - Paper, Scissors and Glue

SUPPLIES | Touch of Glimmer Kit